-
🔎 Javascript this의 모든것Frontend 2020. 3. 19. 18:18
함수 호출과 this
호출 패턴과 this 바인딩
함수 내부에는 암묵적으로 전달되는 인자가 있다.
arguments객체와this이다.this인자는 자바스크립트의 핵심 개념이다.this를 이해하기 어려운 이유는 자바스크립트의 여러가지 함수가 호출되는 방식 즉, 호출 패턴에 따라this가 다른 객체를 참조하기 때문이다. (this 바인딩)
호출 패턴에 따라 this가 어떤 객체를 참조하는지 알아보자.1. 함수를 호출할 때 this 바인딩
함수 내부에서 사용된
this는 전역 객체에 바인딩된다.
여기서, 전역 객체란- 브라우저에서 실행하는 경우에는
window객체 - Node.js의 경우에는
global객체
를 뜻한다.
global.value = 1;

function globalFunction() {
    console.log(this.value); //1
}

globalFunction()
+) 엄격모드 (ECMA Script 5.1 부터)
엄격 모드에서 함수를 실행하면,
this가undefined가 된다.function multiply(a, b) { 'use strict'; // 엄격 모드 console.log(this === undefined); // => true return a * b; } multiply(2, 5); // => 102. 객체의 메서드 호출할 때 this 바인딩
어떤 객체의 프로퍼티가 함수일 경우, 이 함수를 메서드라고 부든다.
메서드에서this는 해당 메서드를 호출한 객체로 바인딩된다.const myObject = { name: 'foo', sayName: function () { console.log(this.name) } }; const otherObject = { name: 'bar' }; otherObject.sayName = myObject.sayName; myObject.sayName(); //foo otherObject.sayName(); //bar3. 메서드 내부 함수에서의 this 바인딩
여기까지 살펴봤다면, 주의할 점이 있다.
만약 메서드에 내부 함수가 있다면? 내부 함수의this는 전역 객체에 바인딩된다는 것이다.global.value = 100; const myObject = { value: 1, //메서드 func1: function () { this.value += 1; console.log(this.value); //2 //내부함수 func2 = function () { this.value += 1; console.log(this.value); //101 //내부함수 func3 = function () { this.value += 1; console.log(this.value); //102 } func3() } func2() } }; myObject.func1();이렇게 출력되는 이유를 알아보자.
자바스크립트에서는 내부 함수 호출 패턴을 정의해놓지 않기 때문이다.
내부 함수도 결국 함수이므로, 이를 호출할 때는 함수 호출로 취급된다.이런 한계를 극복하려면 this를 내부함수가 접근 가능한 다른 변수에 저장하면 된다.
global.value = 100;

const myObject = {
    value: 1,
    func1: function () {
        //this, 즉 myObject를 that에 저장
        const that = this;
        this.value += 1;
        console.log(this.value); //2
        func2 = function () {
            //that으로 접근
            that.value += 1;
            console.log(that.value); //3
            func3 = function () {
                that.value += 1;
                console.log(that.value); //4
            }
            func3()
        }
        func2()
    }
};

myObject.func1();
혹은 화살표 함수를 사용하면 된다.
global.value = 100;

const myObject = {
    value: 1,
    func1: function () {
        this.value += 1;
        console.log(this.value); //2
        //화살표 함수 사용
        func2 = () => {
            this.value += 1;
            console.log(this.value); //3
            //화살표 함수 사용
            func3 = () => {
                this.value += 1;
                console.log(this.value); //4
            }
            func3()
        }
        func2()
    }
};

myObject.func1();
자바스크립트에서는 이와 같은
this바인딩의 한계를 극복하려고,this명시적으로 샤용 할 수 있는call과apply메서드를 제공한다 (뒤에서 소개예정!)4. setInterval의 this 바인딩
비슷한 맥락으로
setInterval도 짚고 넘어가보자.
setInterval은 정해진 ms 뒤에 실행될 callback함수를 넘기게 된다.
이 callback 함수는 global context를 가지기 때문에this가 전역 객체에 바인딩 된다.const myObject = { value: 1, func1: function () { setInterval(function () { console.log(this.value); //undefined }, 500); } }; myObject.func1();우리는 이제 해결 방법을 알고있다!
this를 다른 변수에 저장해놓고 쓰던가
화살표 함수를 사용하면 된다.나는 화살표 함수를 좋아하므로, 화살표 함수로 해결해보았다.
const myObject = {
    value: 1,
    func1: function () {
        setInterval(() => {
            console.log(this.value); //1
        }, 500);
    }
};

myObject.func1();
5. 생성자 함수를 호출할 때 this 바인딩
자바스크립트에서는 함수 앞에 new 연산자를 붙여서 호출하면 생성자 함수로 동작한다.
new Person('sara'); //생성자 함수 호출이는 반대로 생각하면 일반 함수에 new를 붙여도 의도하지 않게 생성자 함수로 동작할 수 있다는 뜻이 된다.
때문에 js 스타일 가이드에서는, 생성자 함수 이름의 첫 문자를 대문자로 쓰기를 권하고 있다.
그럼 생성자 함수에서의 this 동작을 알아보기 이전에, 생성자 함수가 동작하는 방식을 먼저 알아보자.- 빈 객체 생성 및 this 바인딩
빈 객체를 생성하고, this로 바인딩 된다. 이 객체는 생성자의 prototype 객체를 자신의 프로토타입 객체로 설정한다. - this를 통한 프로퍼티 생성
함수 코드 내부에서 this를 사용해서, 빈 객체에 동적으로 프로퍼티나 메서드를 생성할 수 있다. - 생성된 객체 리턴
일반적으로는, this로 바인딩 된 새로 생성된 객체가 리턴된다.
하지만 this가 아닌 다른 객체를 반환하는 경우에는 생성자 함수를 호출했더라도 this가 아닌 해당 객체가 리턴된다.
그렇다면 객체 리터럴 방식과 생성자 함수를 통한 생성 방식의 차이는 뭘까?
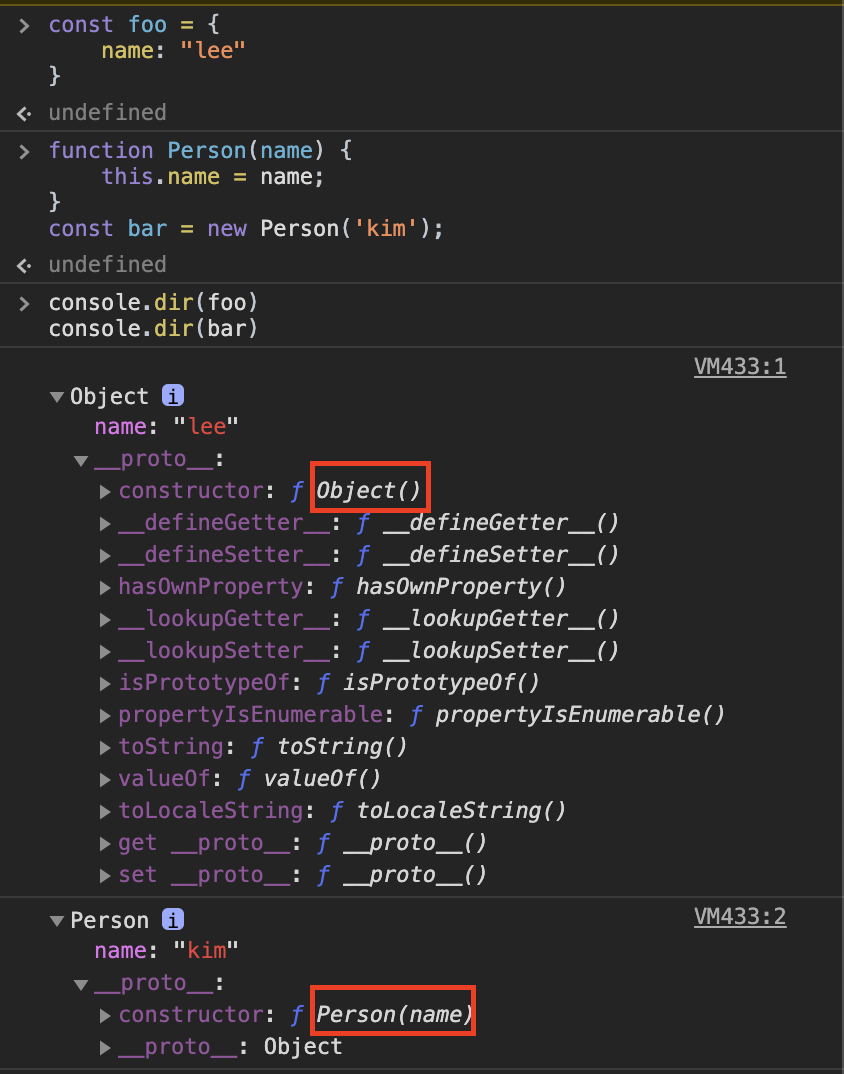
객체 리터럴 방식으로 생성한Object는 constructor가Object()인 반면,
생성자 함수로 생성한Person의 경우는 constructor가Person(param)이다.그렇다면, 생성자 함수를 new를 붙이지 않고 일반 함수처럼 호출하면 어떻게 될까?
function Person(name) { this.name = name; } const park = Person('park'); //new 없이 일반함수로 호출 console.log(park) //undefind (일반함수는 특별한 리턴값이 없으면 undefined를 리턴) console.log(global.name) //park (일반 함수의 this는 global로 바인딩되기 때문)this.name을 할당할 때,this는 일반 함수의 규칙을 따라 global 변수로 바인딩된다.생성자 함수를 일반함수로 호출하는 오류 피하는 방법
더글라스 크락포드와 같은 자바스크립트 전문가들은 객체를 생성하는 다음과 같은 별도의 패턴을 사용하기도 한다.
function A(arg) {
    if (!(this instanceof A)) // 혹은 if (!(this instanceof arguments.callee))
        return new A(arg);
    this.value = arg ? arg : 0
}

const a = new A(100);
const b = A(200)

console.log(a.value) //100
console.log(b.value) //200
console.log(global.value) //undefined
+) class (ECMAScript 6)
ECMAScript 6이후에는, 자바나 C#처럼 class예약어를 사용할 수 있다.
class 예약어에서 메소드를 실행하면, this가 인스턴스 자신을 가리킨다.class Person { constructor(name) { this.name = name; } getName() { console.log(this === Person); //true return this.name; } } const me = new Person('sara'); me.getName(); //'sara'6. call과 apply 메서드를 이용한 명시적인 this 바인딩
위에서 살펴본바와 같이 this는 정해진 객체에 자동으로 바인딩된다.
이런 내부적인 this 바인딩 외에도 this를 특정 객체에 명시적으로 바인딩시키는 방법도 존재한다.
apply() 와 call()
이 두 개의 메서드들은 모든 함수의 부모 객체인
Function.prototype객체의 메서드이다.
따라서 모든 함수는 다음과 같은 형식으로 호출할 수 있다.Person.apply(thisArg, argArray);여기서 기억해야할 것은
apply()메서드를 호출하는 주체가 함수고apply()메서드가 this를 특정 개체에 바인딩 할 뿐 결국 본질적인 기능은 함수 호출 이라는 것이다.Person.apply()를 호출한다면 기본 기능은Person()함수를 호출하는 것이다.function Person(name, age) { this.name = name; this.age = age; } const foo = {}; Person.apply(foo, ['sara', 26]); console.dir(foo) //{ name: 'sara', age: 26 }위 코드는
Person()을 호출하며foo객체를Person()함수의this로 바인딩 시키는 코드이다.apply()와call()의 차이는 뭘까?Person.apply(foo, ['sara', 26]); //인자를 배열로 전달 Person.call(foo, 'sara', 26); //인자를 하나하나 전달apply()와 call()의 대표적인 사용 용도는
바로 유사 배열 객체에서 배열 메서드를 사용하는 경우이다.
function myFunc() {
    console.dir(arguments) //[Arguments] { '0': 1, '1': 2, '2': 3 }
    //console.log(arguments.shift()) //유사배열 객체이므로 배열 메서드를 사용할 수 없다.
    const args = Array.prototype.slice.apply(arguments)
    console.dir(args) //[ 1, 2, 3 ]
    console.log(args.shift()) //1
}

myFunc(1, 2, 3)
위의
apply()함수는,arguments객체를 인자로 하며Array.prototype.slice()를 인자 없이 호출한 형태가 된다.slice()함수는 인자 없이 호출한 경우 배열을 복사하여 리턴한다.
즉,this가arguments인Array.prototype복사본을args변수에 할당한다.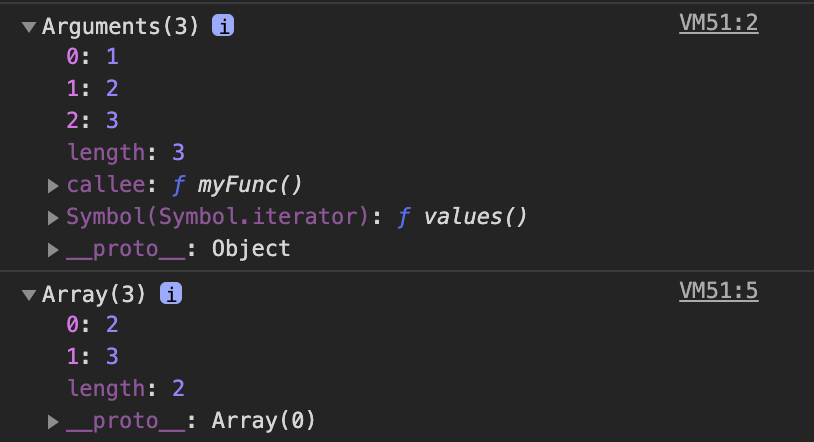
_ _ proto _ _ 가 Object 였다가 Array(0)로 변경된 모습
정리
- 기본 : this는 전역 객체를 가리킨다.
- 메서드 : 객체에 속한 함수 즉 메서드에서는 그 메서드의 객체를 가리킨다.
- 메서드의 내부함수 : 전역 객체를 가리킨다!
- setInterval : 전역 객체를 가리킨다.
- 생성자 함수 : 생성자로 인해 생성된 새로운 객체를 가리킨다.
- call, aplly : 직접 실행문맥을 전한다. 즉, this를 특정 객체에 바인딩 할 수 있다.
'Frontend' 카테고리의 다른 글
Intersection Observer - Lazy-loading, 무한스크롤을 구현하기 좋은 API! (0) 2020.11.23 'installVueDevtools' is defined but never used 오류 해결법 (0) 2020.02.03 Docsify와 netlify로 TIL 페이지 만들기 (0) 2020.01.31 vue에서 got 모듈 에러 핸들링하기 (0) 2019.11.18 webpack 완전 초보들을 위한 기초 (0) 2019.10.18 - 브라우저에서 실행하는 경우에는